
Posted: Aug 6, 2020
When piercing holes in metal, there are a few critical rules to observe. Below, you’ll find detailed diagrams and explanations on how to achieve the desired piercing.
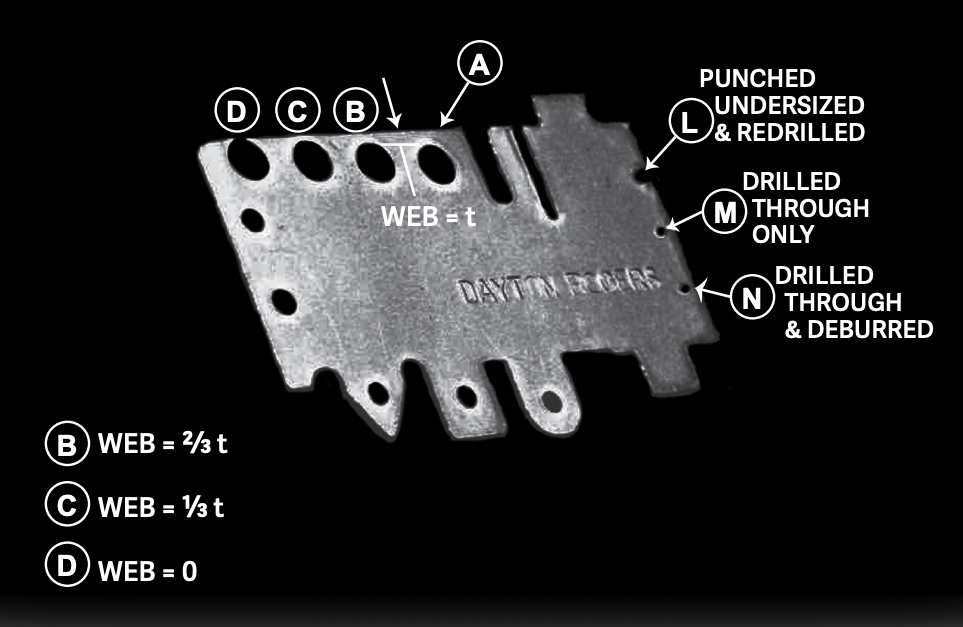
(A) The outside edge of the blank adjacent to this punched hole should not bulge because the web (material between the edge of the hole and the outside contour of the blank) is equal to the material thickness “t”.
(B) In this case, the edge of the blank will bulge slightly (measurable but hardly visible) because the web is less than the stock thickness. In this instance, the web is equal to 2/3 of the stock thickness “t”.
(C) The bulge is noticeable because the web is much less than the material thickness, only 1/3 of “t”.
(D) With no web, the punched hole, which is tangent with the edge, will break through.
(L) In this instance, we punched the hole undersize and redrilled to size without deburring to illustrate the small burr that will occur from redrilling. This burr will occur on the drill side or, in this instance, on the burr side of the blank.
(M) Here, too, the same narrow web (1/2 of “t”) exists, but the hole was drilled through to avoid bulging. Drilling is, of course, much slower than punching and in addition there is a burr on the opposite side, which may or may not be objectionable.
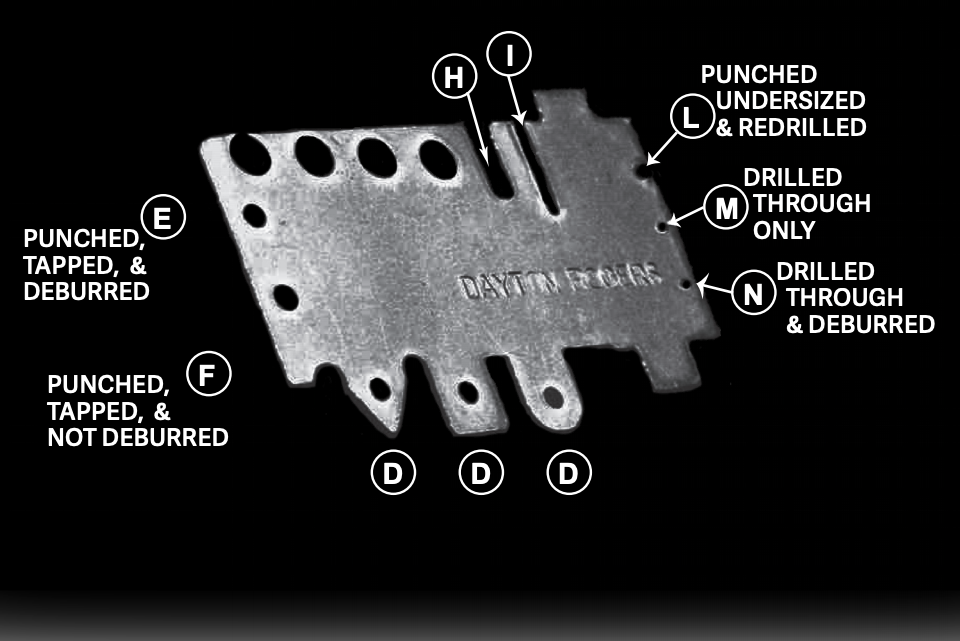
(N) As in the explanation (M), this hole was also drilled through; and in addition was deburred on the far side by lightly countersinking. Two operations are needed and either one is slower than punching, so the costs increase to several times the price of the punched holes in explanation (A), (B), (C), and (D), or the punched and redrilled hole in the explanation (L).
(E) This No. 3 (medium fit) tapped hole was produced in three operations: punch, tap, and remove burr. (For a No. 4 class fit punch undersize, redrill to remove the breakage from punching, tap and remove burr is required.)
(F) This No. 3 (medium fit) tapped hole was produced in two operations: punch and tap. If the burr from the tapping is acceptable, the production cost would be lower than the procedure outlined in the previous explanation (E).
(W) (V) & (U) These holes were punched in the flat blank before forming.
(I) This notch was too narrow and too long to include in the blank and was therefore punched after blanking. This notch may require tools and will require an extra operation which will increase the cost in comparison to the adjacent notch (H), explained under “Blank Conditions”– to see, download the Black Book below.
Following these rules will ensure a desired metal blank. Want more metalforming and metal fabrication tips for designers and engineers? Get your FREE copy of the Design Principles Black Book. This Design Principles booklet describes the various common conditions that occur in the fabrication of parts.

Download the Design Principles Black Book
Dayton Rogers is your trusted resource for sheet metal fabrication, metal stamping, metalforming and all your manufacturing company needs. Get a free quote today on your custom metal fabrication project.
LOCATIONS