
Posted: Aug 30, 2019
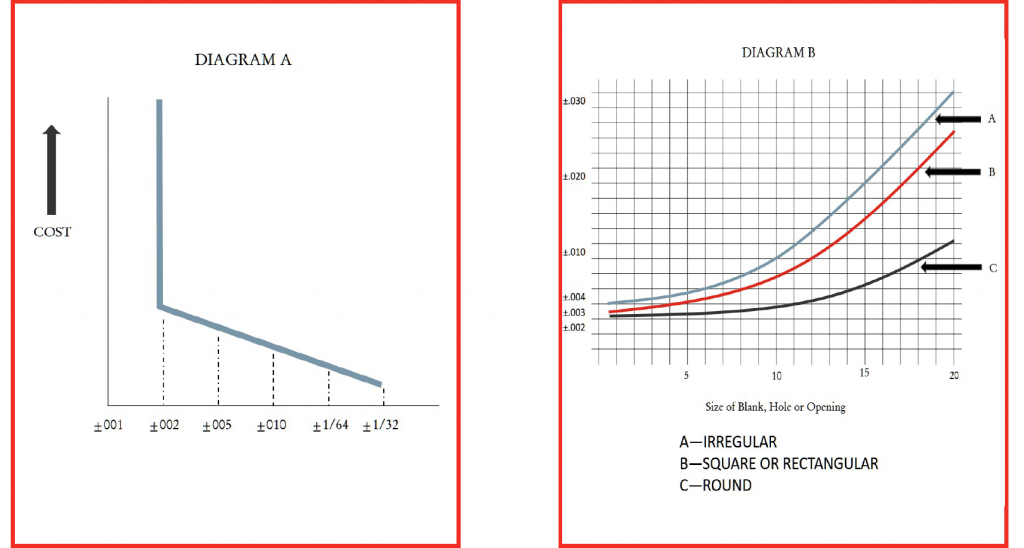
Practical tolerances for our Short Run Metal Stampings vary according to the design of the part. Generally, all dimensional tolerances compared to costs can be illustrated by the following diagram “A”.


Reading from right to left, we illustrate that within the more generous limitations, the cost increases slowly—but, as the permissible variance is reduced, the cost increases more rapidly—and as the limits are still further reduced, the cost increases sharply to the extent that it might be impractical to stamp. There is a definite breakoff for stamping operations beyond which machining, grinding, lapping, honing, and other precision operations must be employed.
On diagram “B”, we indicate the relation between tolerance and size for flats, or holes and openings in flat blanks, for the most economical tools and production. These tolerances can be held on the die side of the part and the punch side of the holes and openings.
For the most economical tooling and production of related holes, the hole location is referred to as the dimension between holes and hole location is determined from a centerline of the blank.
Using these interpretations, we can hold plus or minus .005 tolerance between hole centers with the lowest priced tooling. For plus or minus .002 tolerance between hole centers, slightly higher priced tooling would be used. In contrast, close hole locations measured to the blank contour could require expensive dies and additional operations.
Want more metalforming and metal fabrication tips? Get your FREE copy of the original Dayton Rogers Red Book. This powerful book is your resource for all things metalforming and stamping.
Dayton Rogers is your trusted resource for sheet metal fabrication, metal stamps, metalforming and all your manufacturing company needs. Get a free quote today on your custom metal fabrication project.
LOCATIONS